

If you're using Office 365 you may already be exploring Microsoft Teams as a way of stayng in touch with your colleagues - or even planning your 'face-to-face' meetings with external collaborators.
In this short guide we look at some of the key things you can do to make your meeting a successful one - from pre-meeting to recording.
Scheduling internal meetings
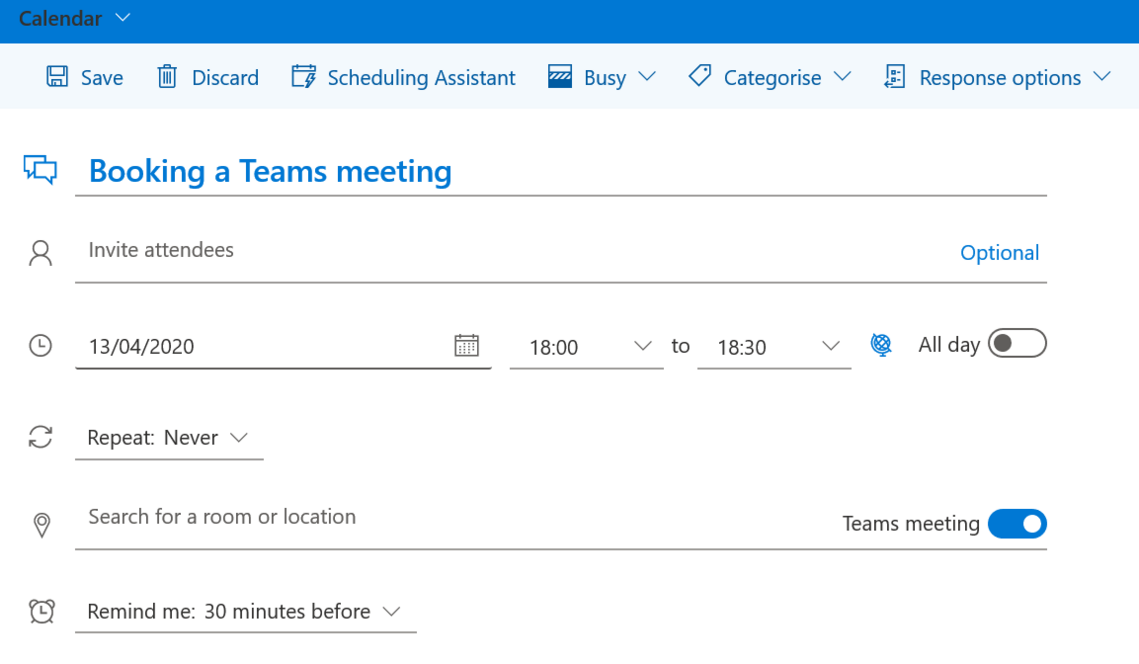
If you are scheduling an internal meeting this is easy enough to do from within a Team and any of its channels. You can invite a whole Channel (including the 'General' channel for the top level Team).
What this option doesn't do is send an email or an Outlook calendar invite. And that's not great - after all, calendar and email is still where lots of your Team members (and even you!) could look first to figure out what's going on that week.
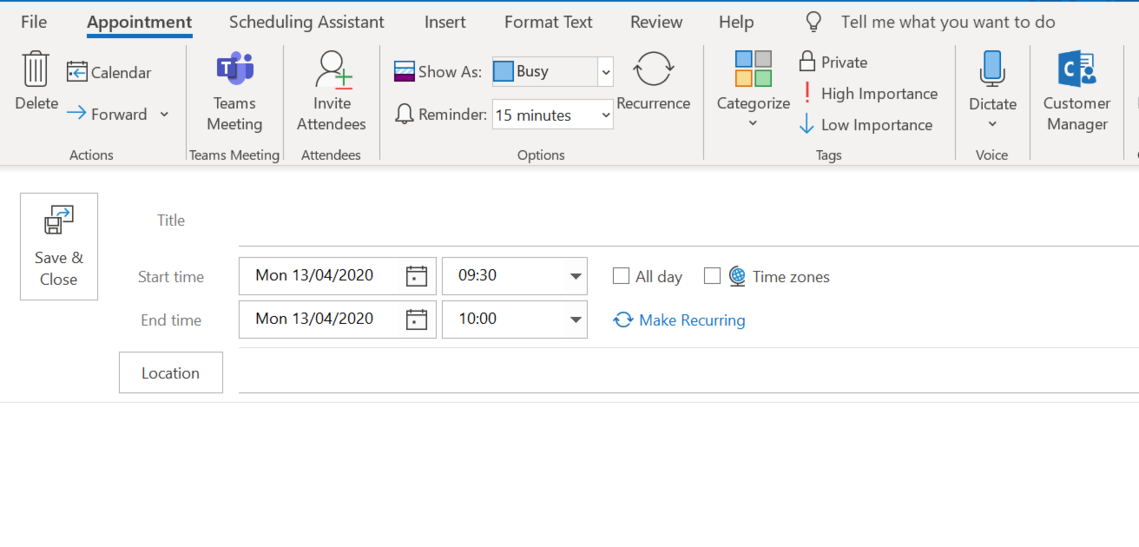
If you want to make sure people get an email or a calendar invite the best option is to create the meeting as an appointment using your Outlook desktop app - and then add a Teams meeting to it in the options. Like this:
Scheduling (anonymous) external meeting
If you have a meeting with people outside your organisation do you want everyone to be able to see the other participants email addresses?
If you invite people via Microsoft Teams or through a Microsoft Outlook appointment the email addresses will be visible.
To avoid this you'll need copy and paste the Microsoft Teams meeting link into an email that you then bcc everyone's email addresses. When attendees join the meeting they’ll appear without an email address.
Getting yourself ready for a meeting
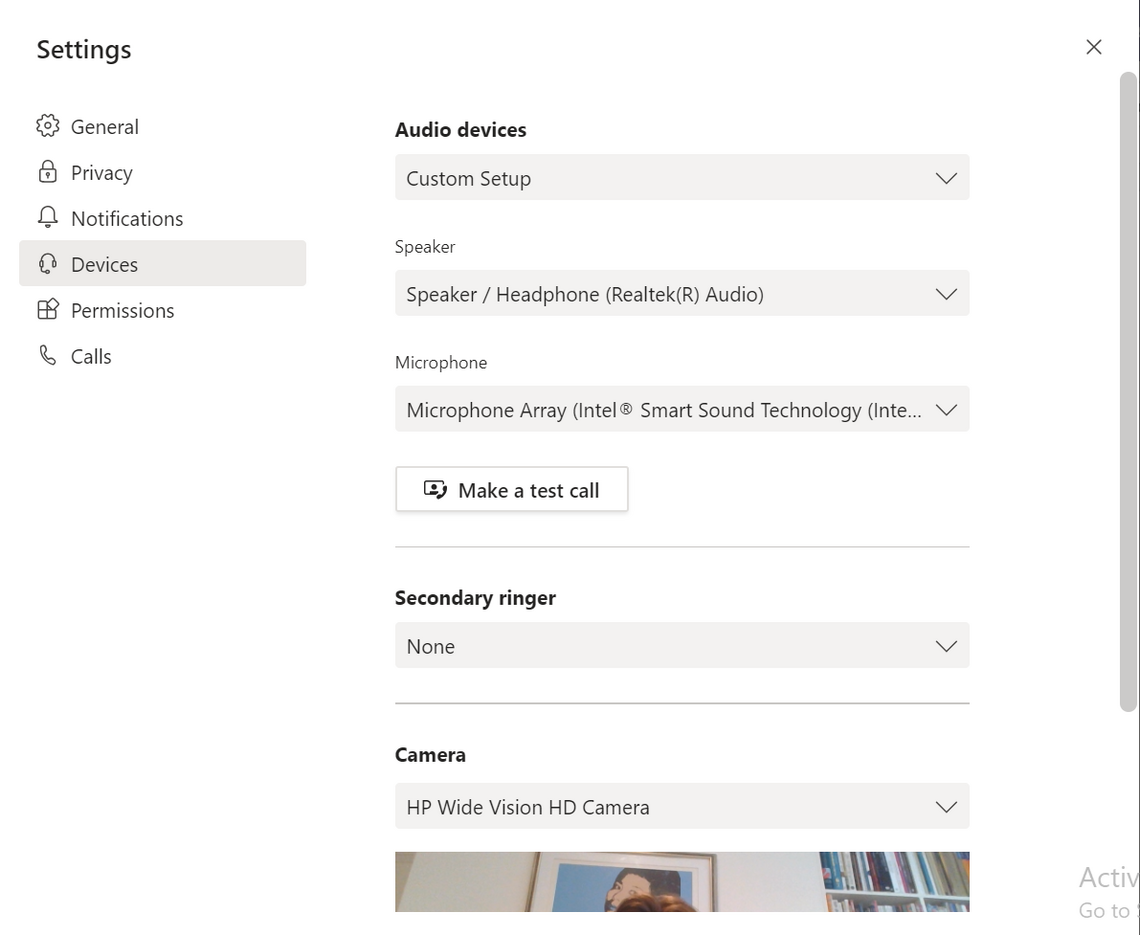
Before starting the meeting it’s a good idea to check:
- Your camera and microphone are working
- Your background is appropriate - try and find a plain background if you cannot see the option to 'Blur your background'
- Coming soon you'll be able to select a background image (and in future add your own). Look out for the 'Show background effects' which is currently being rolled out
- You are well framed by the camera (sometimes just slightly changing position can provide a better angle for your viewer)
- The camera is on a line with your eyes so you are looking directly at the participants - you wouldn't loom over them in a non-virtual space so it's a good idea not to online too
To check all of these, in Teams, click on your Profile Picture (or initials) and go to Settings>Devices:
Dealing with connection problems
Poor bandwidth quality can really interrupt a meeting if you or any or your participants are struggling with a bad connection. Here are some basic things you can do to improve your connectivity:
- Close all applications running on your computer, tablet or phone so that they are not taking up valuable bandwidth
- Make sure your browser is up-to-date, running the latest version of any browser will guarantee a more stable experience
- Restart your browser before a call and make sure you don’t open too many tabs
- Restart your computer – this clears the temporary cache and resets the network setting
Microsoft Teams settings
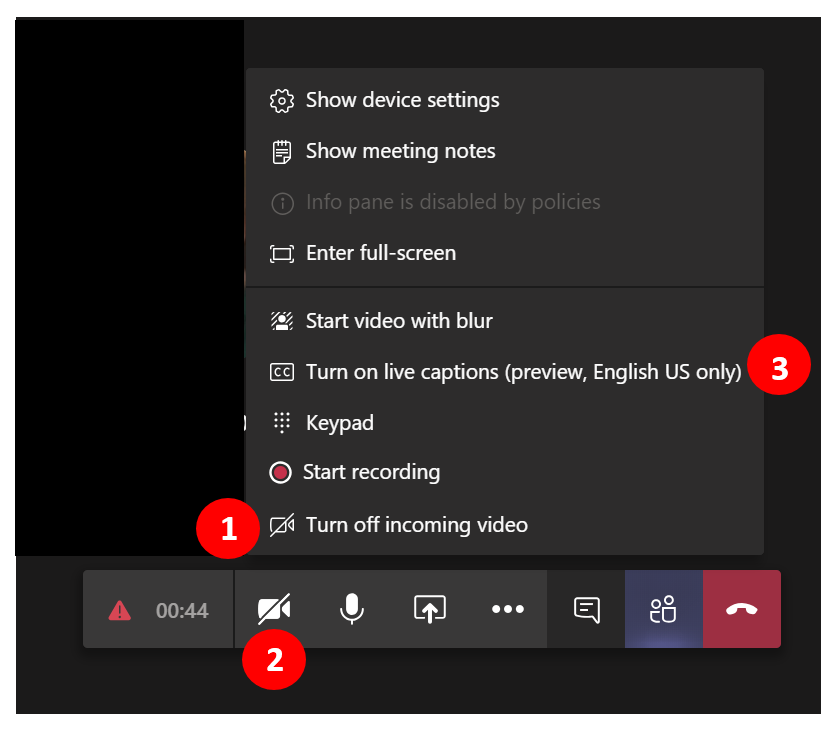
Try the following steps (accessed via the floating meeting tool bar and via the more options menu represented by the 3 dots …)
- Turn off incoming video
- Turn off your own video
- Turn on Live captions so that if the audio and visual fail participants can catch up by reading the transcript
You can also suggest that participants struggling with connectivity or audio / webcam issues - can still participate and input or ask questions, by using the Chat feature.
Managing an external meeting
You don’t need a Microsoft Teams licence to join a meeting. So once you’ve emailed the link to your participants they will be able to access the meeting simply using the link.
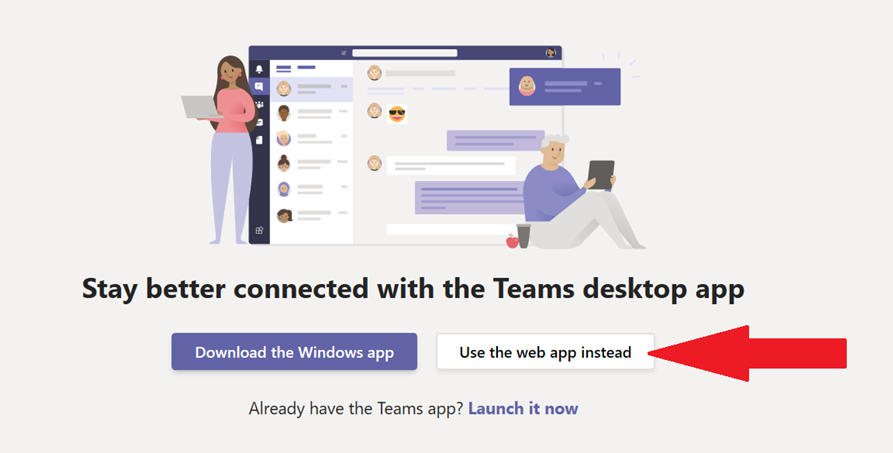
When they click on the link they will see a message on screen asking them whether they would like to download the desktop app or use the web browser instead.
To ensure you get every one online quickly, encourage participants to select the option 'Use the web app instead' and to download the Windows app at a later date in readiness for other meetings.
The web app has a little less functionality but it’s sufficient for a meeting participant who doesn't need the same controls as the meeting host.
Using the virtual waiting room
When holding a meeting with external participants they will automatically be sent to a virtual waiting room, the 'lobby', until you accept them into a meeting.
It’s a good idea to only start the meeting when all external participants are ready, otherwise it’s hard to prevent either an uncomfortable silence or the meeting kicking off too early.
External participants will, by default, be held in the virtual lobby and you will need to admit them either one by one or as a group into the actual meeting.
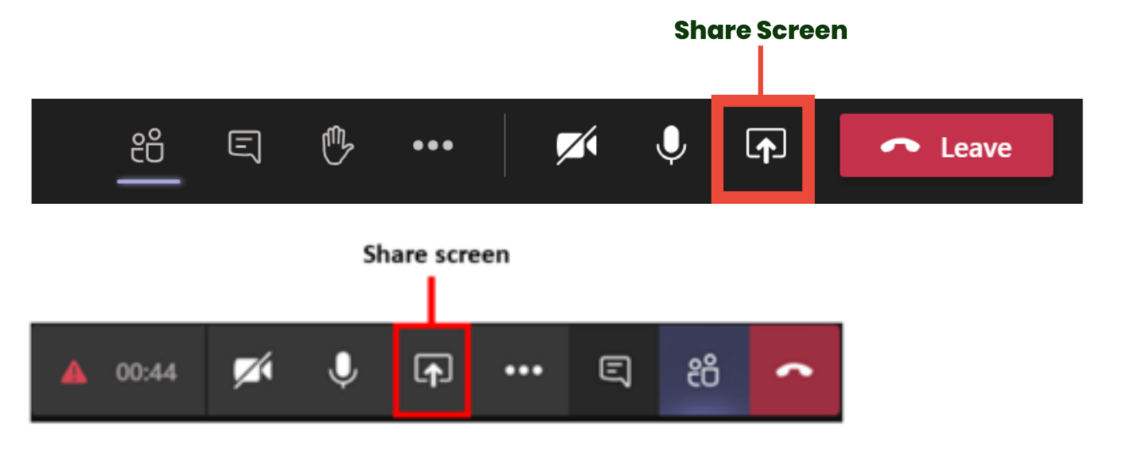
Sharing your screen
Click on the screen little screen icon with arrow to share your screen with your participants: Depending on whether you have upgraded to the latest version of Teams, your meeting controls will look like either of the following.
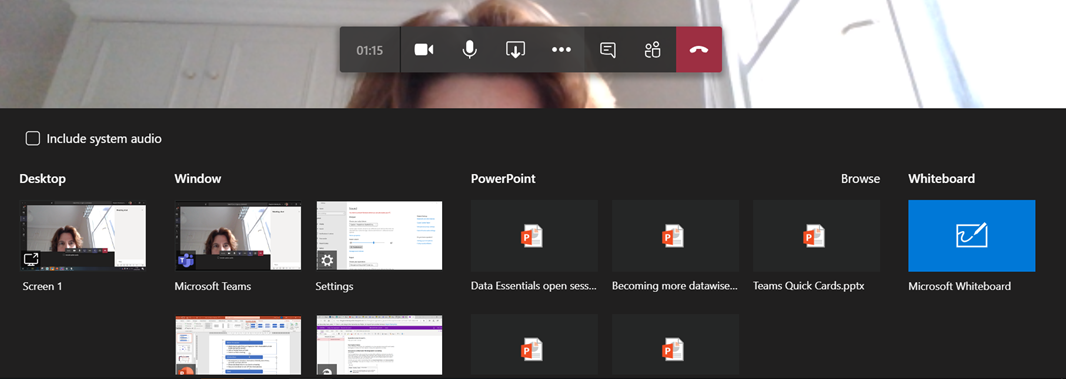
When holding a meeting with external participants it’s good to be aware of data security when sharing your screen.
It’s easy to accidentally click onto a file which contains private information or into your email revealing other people’s email addresses.
There are two ways around this:
- Close all applications that you do not require for your meeting (recommended for bandwidth too)
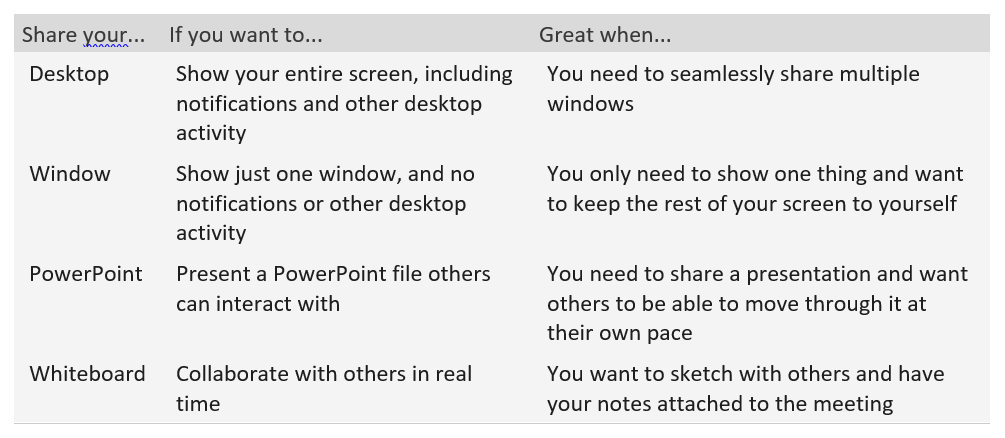
- Use the screen sharing options to control what people see:
Managing a meeting
Ask someone to assist
For meetings with more than a few participants a good idea to ask someone to co-host with you to help.
They can make sure all participants are online - your co-host can text, call, answer emails etc. off-meeing, with the participants who are struggling to join.
A co-host can also keep you posted on whether the sound and visuals are working. Such as whether the print on the presentation is too tiny when screen sharing for others to read. Or asking them to turn off their microphones when typing. Can everyone hear you?
Online meetings require a lot of management: don’t try to do it all alone if you have a colleague you can rope into help.
Introductions
Begin with a round of introductions. Don’t expect everyone to jump in and introduce themselves but call on everybody one by one in alphabetical order.
You can use the participants list available via the participants button on the meeting tool bar (only available when the meeting is running). As aove depending on whether you have upgraded to the latest version of Teams, your meeting controls will look like either of the following.

Ensure good sound quality
- Use a headset with a microphone wand if possible
- Request that everybody turns off the microphone to reduce background noise (as a meeting host - you can also Mute all in the Participants screen (useful if someone is in the kitchen with their washing machine on!)
- If not using a headset, be aware that everyone can hear you typing so either ask someone not presenting to take the notes or turn off your own microphone when typing.
Record a meeting or a group call
If hosting a meeting with external applicants don’t forget to start by getting everyone's permission before you start recording them.
To start recording, go to the meeting controls and select More options > Start recording.
When a meeting recording starts, Teams shows a notification to all participants on the Teams desktop, web, and mobile apps, as well as to people who joined via phone.
To stop recording, go to the meeting controls and select More options > Stop recording. Alternatively it will automatically stop when the last participant leaves the meeting.
The recording is then processed (which could take awhile) and saved to the Microsoft Stream app. Then it's ready to play.
The person who started the recording receives an email from Microsoft Stream when the recording is available. It also shows up in the meeting chat - or in the channel, if you’re meeting in a channel.
Next steps
That's some of the essentials for running a successful Microsoft Teams meeting.
Let us know if you have any top tips - or alternatively if you would like a quick tour or training so you can confidently set up and run a meeting in future.
Stay in touch
If you would like to receive news and updates about training, tech tips, resources and opportunities for small charities and community groups in London please sign up to our mailing list.